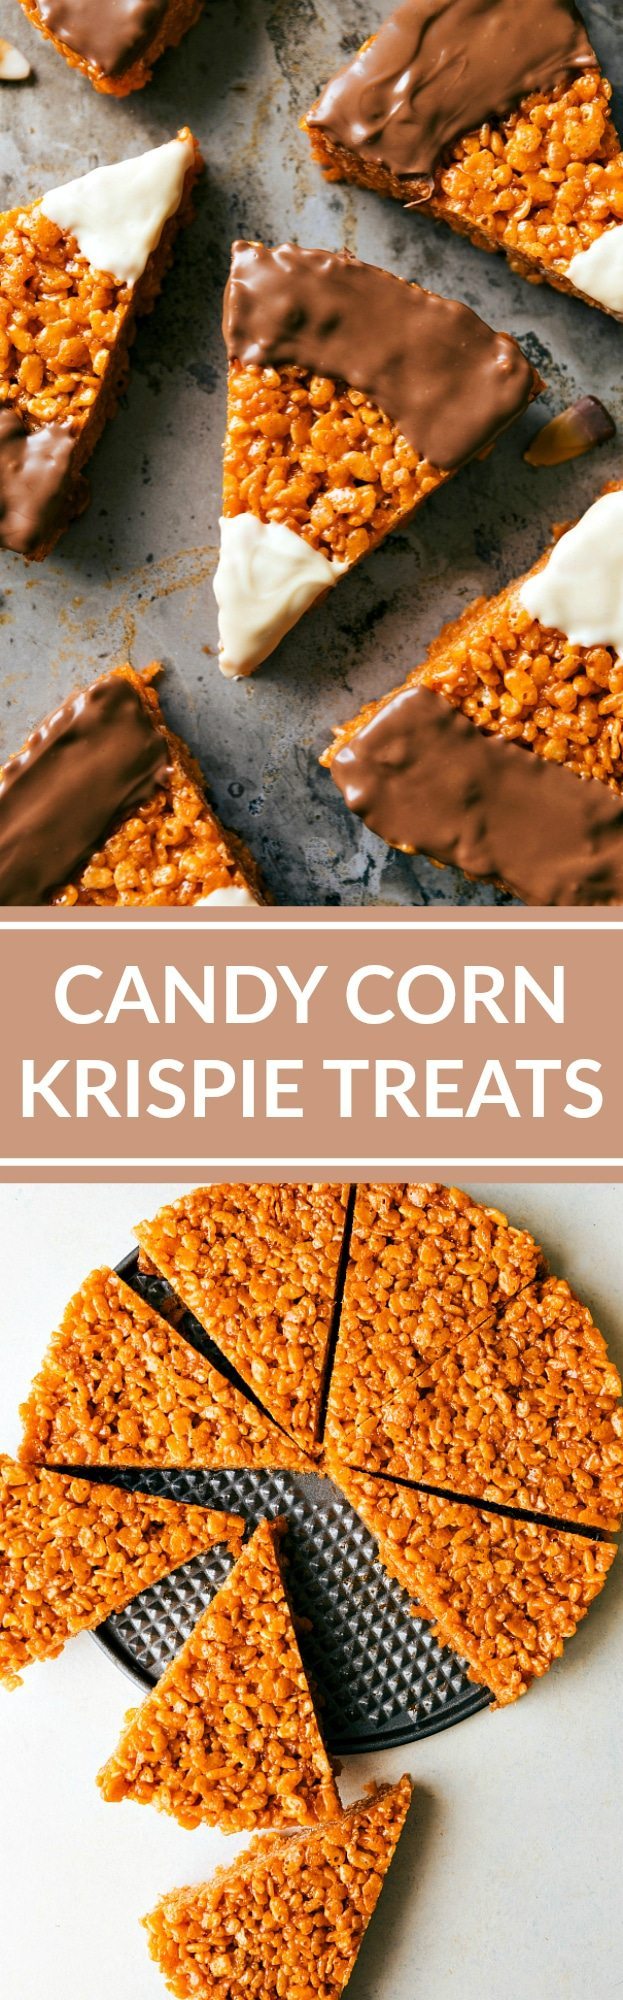
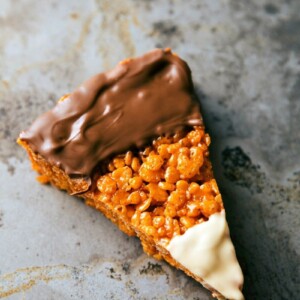
Candy Corn Krispie Treats are the most fun and delicious fall treat! Sweet peanut butter Rice Krispie® treats are made to look like peanut butter candy corns and decorated with two types of chocolate — delish!
We’re obsessed with all things fall-time and Halloween! Download our Free Fall Bucket List or check out our collection of Halloween Rice Krispie Treats!

Candy Corn Krispie Treats
My kids and husband love candy corn and I can’t think of a candy I like less than candy corn. Which camp are you in? Like ’em or leave ’em?!
As much as I dislike regular candy corn, this version is delicious!. And the main reason they’re so tasty is that there aren’t actually any candy corns in the recipe! They just look like it, but instead are made with Rice Krispies, marshmallows–and peanut butter. I’m convinced that just about any treat is improved when you throw in some peanut butter! 🙂
And for as many treats made to look like the regular (orange-yellow-white) candy corns, I’ve never seen any treats that look like the peanut butter candy corn. Until now — they’ve finally got their spot in the world!
These Candy Corn Krispie Treats start with a scotcheroo-reminiscent base that we dye with some food coloring and then coat in two types of chocolate to get the different colors. It may seem like a lot, but I promise, they’re easy to make!
Quick Tip
Love Krispie Treats? Us too! Try some of our other versions next: plain Rice Krispie Treats, Peanut Butter Rice Krispie Treats, Fruity Pebble Rice Krispies Treats, Peppermint Rice Krispie Treats, or Chocolate Rice Krispie Treats.

Candy Corn Krispie Treat Tips
- Use a springform pan: A 9-inch springform pan (a pan that has a spring to hold the sides of the pan in place) is the best for these treats. A second option is a 9-inch cake pan, but you will need to invert the Krispies if going that route–and that does have more potential to break/fall apart.
- Low heat: When marshmallows are exposed to high heat, they harden and will make the treats hard as a rock. The lower the heat, the longer it takes for the marshmallows to melt, but the better this treat will turn out.
- Use extremely fresh marshmallows: The fresher the marshmallows, the softer and more enjoyable the Candy Corn Krispie Treats will be. I generally buy marshmallows the same day I make these.
- Don’t overcook the marshmallow mixture: Stir over low heat until the marshmallows are just melted. It’s also important to stir the marshmallows constantly while they are melting.
- Avoid compressing: Don’t push the Krispie mixture into the prepared pan. Instead, place them in the pan and gently press them down. The less you compact these treats, the better they will be. When bars are heavily compressed, it makes the treats overly firm and not as enjoyable to eat.
Quick Tip

Candy Corn Krispie Treat Tips, Cont.
- We found spooning the melted chocolate over the treats was the easiest way to decorate. Dipping the ends in bowls of chocolate got a bit messy and individual Krispies had a tendency to fall into the bowls.
- The best food coloring for these is neon orange food coloring. You can mix to create your own orange with red + yellow, but if you want a super bright and vibrant orange then go with the neon orange.
- Avoid refrigerating or freezing these treats to try and speed up the process of getting the Krispies to firm up or the chocolate to set. Let them set up at room temperature and let the chocolate topping harden at room temperature.

Tips For Melting Chocolate
- Melt the chocolate slowly and stir it often. To avoid burning the chocolate, don’t rush the melting process. Microwave the chocolate in bursts of time, remembering that the chocolate is still melting even after you take it out of the microwave. Make sure to give the chocolate plenty of time to melt outside of the microwave as you stir.
- Use high-quality milk and white chocolate for the best results. You’ll get both a better melt and a better flavor. My favorite chocolate for these Candy Corn Krispie Treats is Ghirardelli® or Guittard®. Cheaper brands can have a waxier content that is less flavorful.
- Don’t allow any liquid near the chocolate. If it gets wet it will seize and harden, and you don’t want that.
- Microwave the chocolate chips in sturdy, heat-safe bowls instead of using plastic or melamine.

Storage
Candy Corn Krispie Treat Storage
These treats are best (texture and taste-wise) within the first couple of days (we like them best on day 1). Keep the bars in an airtight container at room temperature while storing.
Freezing: The same day the bars are made (once the chocolate topping has fully set), you can freeze these bars. Cut into even-sized bars and wrap each treat in a square of wax paper and then plastic wrap. Place the wrapped treats in a resealable freezer bag. Store in the freezer bag for up to 6 months.
Thawing: Thaw the Candy Corn Krispie Treats by removing an individual bar from the freezer and setting it out on the counter for 15-20 minutes or until it reaches room temperature. The chocolate may thaw a bit white-streaked — this is simply the cocoa solids rising to the top. Not as pretty, but perfectly safe to eat!

More Fun Fall Treats
- Pumpkin Cupcakes with cinnamon cream cheese frosting
- Apple Crumble with a thick crumb topping
- Acorn Donut Holes with store-bought donut holes
- Pumpkin Whoopie Pies with frosting in the center
- Apple Fritter Bread with a glaze
Candy Corn Krispie Treats
Equipment
- Springform pan or cake pan, 9-inch
- Medium pot
Ingredients
- 8 tablespoons unsalted butter
- 2/3 cup brown sugar lightly packed
- 1/3 cup heavy cream
- 1/8 teaspoon salt
- 1/3 cup + 3 tablespoons creamy peanut butter divided
- 1/2 tablespoon vanilla extract
- 2 cups mini marshmallows see note 1
- Orange food coloring neon
- 5 cups Rice Krispies cereal
- 3/4 cup milk chocolate chips
- 1/3 cup white chocolate chips
Instructions
- Prepare a round 9-inch springform pan by generously spraying with cooking spray. A cake pan of the same size will also work. Set aside.
- In a medium pot, add the butter and heat over medium high. Once the butter is melted, add brown sugar and stir until dissolved, about 1–2 minutes. Stir in the heavy cream, and bring to a boil, stirring constantly. Boil for 1 minute, then turn the heat down to low.
- Stir in 1/3 cup of peanut butter and food coloring. Stir until combined. Add in the marshmallows (see note 2) and stir constantly until melted.
- Remove from the heat and add in the vanilla and Rice Krispies. Stir until the cereal is well coated.
- Gently press the mixture into the prepared pan. Lightly compress the Krispies but be careful not to make them dense. To help create an even layer, spray your hands with cooking spray. Let the treats set at room temperature for about an hour until firm.
- Remove treats from pan by removing the sides of the springform or inverting the cake pan. Cut treats like a pizza to form 8 triangles. Pull apart.
- Grab 2 separate bowls. Fill one with the milk chocolate and 2 tablespoons of peanut butter. Fill the other with white chocolate and 1 tablespoon of peanut butter. Melt in the microwave in bursts of 15–20 seconds, stirring for 20 seconds in between each burst until completely melted.
- Spoon the milk chocolate over the bottom of each triangle and the white chocolate over the top of the triangles. Allow the chocolate to set at room temperature. Treats are best enjoyed the same day they're made.
Video
Recipe Notes
Nutrition
Nutrition information is automatically calculated, so should only be used as an approximation.


These look so fun! Very creative and perfect for Halloween!
Just pinned this for my girls . . we love this idea! can’t wait to try this recipe!
These are so fun! i love making Rice Krispie treats and can’t wait to make these for my boys!
Thank you so much Matt! 🙂
Ah I LOVE candy corn, and I’ve actually never had the peanut butter version (definitely going to be on the lookout for that). This rice krispie treat candy corn is so cute and genius!